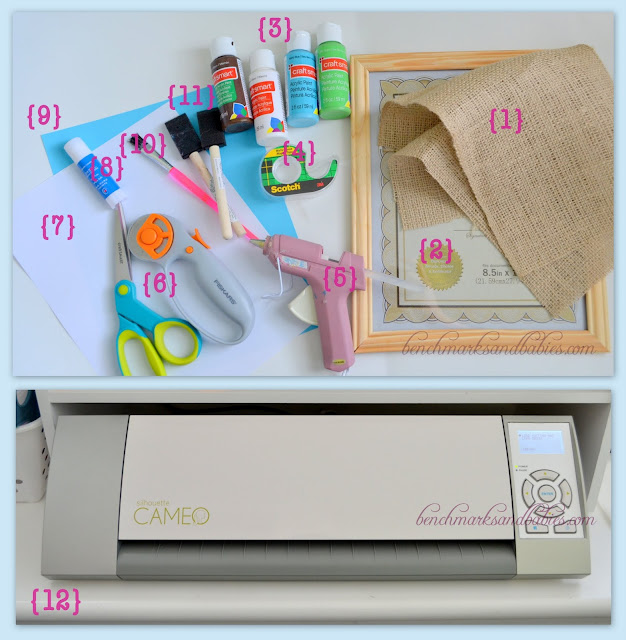
A Dollar Tree find plus supplies I already had.
The other night, I made this burlap wall art piece, inspired by my three little ladies.
I had so much fun making it that since, I've made several versions and designs and thought I'd share a how-to. {Not to mention, J has been giving me a hard time about not posting any crafts or recipes lately...}
For this particular piece, I chose to use the word "nest" along with two different frames. The frames were templates I found in the Silhouette shop.
Here's what you need:

{1} Burlap
{2} An 8.5 x 11 inch picture frame {I got this from the Dollar Tree. You can also use painting canvas or any other old frames you have around}
{3} Assortment of acrylic paints
{4} Magic Tape
{5} Your trusty glue gun
{6} A pair of sharp scissors or a rotary cutter
{7} A sheet of plain white paper
{8} Glue Stick
{9) A sheet of cardstock {I used a 65 lb. weight stock}
{10}A flat, stiff-bristled paint brush
{11}A few sponge brushes
{12}Silhouette Cameo electronic cutting tool
HOW-TO:
{1}
Remove the inserts within the picture frame and place your sheet of plain white paper inside.
{2}
Cut a piece of burlap according to your frame or canvas size. Make sure to cut about a 1 1/2 to 2 inch allowance on each side.
{3}
Place your frame or canvas front side down on the burlap.
At the corners, cut a slit from the edge of the burlap to the corner of the frame. This helps to make flatter folds once you glue the burlap down.
{4}
Using your trusty glue gun, carefully glue down the edges of the burlap onto the back of the frame or canvas. Trim any frays as needed. As you are gluing, make sure that you are pulling the burlap just enough so that it is taut around the frame or canvas. {You don't want to stretch it out too much because it creates an uneven pattern and even holes on the front}
When you are done, the front should look like this:
{5}
Using white acrylic paint and your flat, stiff bristle brush, make small, swift, and light strokes onto the front and sides of the frame or canvas.
Something I've also learned during my several projects is when you are getting paint from your palette, use the brush to draw it out and away from the main puddle and tap it down around the palette. Try not to just dip the brush directly onto the paint. This allows for a lighter on your brush and eventually onto your canvas so that it looks more rustic.
When you are done, the canvas should have an uneven and rustic texture and finish like this:
{6}
Using your Silhouette Studio software, pick your design and format it accordingly, so that it is the size you want. For this design, I chose the 4 Nested Frames {Ungroup the frames and choose which ones you want to use. I chose the two largest ones} and the word "nest" in CAC Champagne font.
When you are ready and satisfied with your design, use the Silhouette machine to cut out your design on the sheet of cardstock.
{7}
The next few steps are done in layers, so patience is very important. In this case, I started from the outside of the design and worked my way in. {For other designs like the bird nest I did above, it's best to work from the largest aspect of the design -- in that case, the main nest itself -- to the smallest, which were the eggs.} For this project, I started with the largest swirl frame first. Tape the cardstock stencil onto your canvas.
Use your sponge brush in the same method of acquiring paint from the palette, gently press paint onto the edges of the stencil.
Hold down any edges of the stencil that may pop up as you paint. Also, what I really wanted to show was the outer shape of the frame, so I made sure that the edge between the stencil and the canvas was well covered with paint.
In this case, I was not as concerned with the center of the item, as it was going to be covered anyway.
{8}
To ensure that the next stencil was perfectly aligned, I placed it on the canvas before taping it down and removing the outer frame.
Use the same sponge painting method to fill in the stencil. This time, fill in the whole open center with paint.
{9} Once the previous layer is complete, add the stencil with your letters. Tape the edges as you did with the previous stencils. Since this part has smaller pieces that may pop up, use a glue stick to adhere them to the canvas surface temporarily. {Examples would be the piece on the "n" below as well as the center of the "e", which was cut out separately, so I had to place it onto the canvas and glue}
{10}
Use the same sponge method to fill in the letters. This time, I used white acrylic paint again to make the letters stand out.
Et voila!
If you decide to try this, share it with us! Email it to me and I'll put up a post of your crafts!
HAPPY CRAFTING!


1 comments:
LOVE!!!
Post a Comment
Thank you for leaving me some love!