Pages

Showing posts with label crafts. Show all posts

Burlap Wall Art

Call it a Pinterest inspiration with a more frugal twist = 
A Dollar Tree find plus supplies I already had.


The other night, I made this burlap wall art piece, inspired by my three little ladies.
I had so much fun making it that since, I've made several versions and designs and thought I'd share a how-to. {Not to mention, J has been giving me a hard time about not posting any crafts or recipes lately...}


For this particular piece, I chose to use the word "nest" along with two different frames. The frames were templates I found in the Silhouette shop.


Here's what you need:
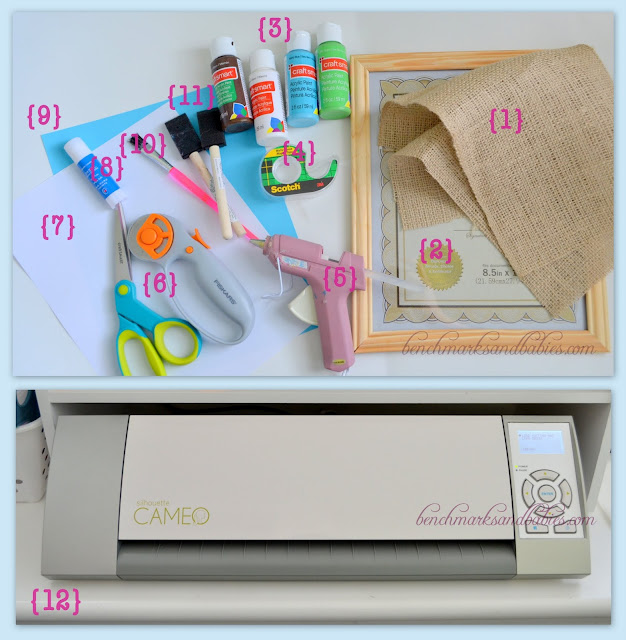
{1} Burlap
{2} An 8.5 x 11 inch picture frame {I got this from the Dollar Tree. You can also use painting canvas or any other old frames you have around}
{3} Assortment of acrylic paints
{4} Magic Tape
{5} Your trusty glue gun
{6} A pair of sharp scissors or a rotary cutter
{7} A sheet of plain white paper
{8} Glue Stick
{9) A sheet of cardstock {I used a 65 lb. weight stock}
{10}A flat, stiff-bristled paint brush
{11}A few sponge brushes
{12}Silhouette Cameo electronic cutting tool


HOW-TO:
{1}
Remove the inserts within the picture frame and place your sheet of plain white paper inside.

{2}
Cut a piece of burlap according to your frame or canvas size. Make sure to cut about a 1 1/2 to 2 inch allowance on each side.

{3}
Place your frame or canvas front side down on the burlap.
At the corners, cut a slit from the edge of the burlap to the corner of the frame. This helps to make flatter folds once you glue the burlap down.

{4}
Using your trusty glue gun, carefully glue down the edges of the burlap onto the back of the frame or canvas. Trim any frays as needed. As you are gluing, make sure that you are pulling the burlap just enough so that it is taut around the frame or canvas. {You don't want to stretch it out too much because it creates an uneven pattern and even holes on the front}
When you are done, the front should look like this:

{5}
Using white acrylic paint and your flat, stiff bristle brush, make small, swift, and light strokes onto the front and sides of the frame or canvas.
Something I've also learned during my several projects is when you are getting paint from your palette, use the brush to draw it out and away from the main puddle and tap it down around the palette. Try not to just dip the brush directly onto the paint. This allows for a lighter on your brush and eventually onto your canvas so that it looks more rustic.
When you are done, the canvas should have an uneven and rustic texture and finish like this:

{6}
Using your Silhouette Studio software, pick your design and format it accordingly, so that it is the size you want. For this design, I chose the 4 Nested Frames {Ungroup the frames and choose which ones  you want to use. I chose the two largest ones} and the word "nest" in CAC Champagne font.
When you are ready and satisfied with your design, use the Silhouette machine to cut out your design on the sheet of cardstock.

{7}
The next few steps are done in layers, so patience is very important. In this case, I started from the outside of the design and worked my way in. {For other designs like the bird nest I did above, it's best to work from the largest aspect of the design -- in that case, the main nest itself -- to the smallest, which were the eggs.} For this project, I started with the largest swirl frame first. Tape the cardstock stencil onto your canvas. 
Use your sponge brush in the same method of acquiring paint from the palette, gently press paint onto the edges of the stencil. 
 Hold down any edges of the stencil that may pop up as you paint. Also, what I really wanted to show was the outer shape of the frame, so I made sure that the edge between the stencil and the canvas was well covered with paint.
In this case, I was not as concerned with the center of the item, as it was going to be covered anyway.

 {8}
To ensure that the next stencil was perfectly aligned, I placed it on the canvas before taping it down and removing the outer frame.
Use the same sponge painting method to fill in the stencil. This time, fill in the whole open center with paint.

{9} Once the previous layer is complete, add the stencil with your letters. Tape the edges as you did with the previous stencils. Since this part has smaller pieces that may pop up, use a glue stick to adhere them to the canvas surface temporarily. {Examples would be the piece on the "n" below as well as the center of the "e", which was cut out separately, so I had to place it onto the canvas and glue}

{10}
Use the same sponge method to fill in the letters. This time, I used white acrylic paint again to make the letters stand out. 

Et voila!

If you decide to try this, share it with us! Email it to me and I'll put up a post of your crafts!

HAPPY CRAFTING!

It's Bunco Night and I'm on a Roll

I think my job here is done.
The neighborhood ladies have now pegged me Martha Stewart.
I'd like to make one thing clear, however:
The oxford shirts, I'm okay with. 
The haircut? 
I absolutely refuse.

I joke
but in all honesty, 
I DO love all the crafting and cooking and entertaining
and quite frankly, 
it has been a blessing to be able to do this.
It has helped us form new friendships
and nurture old ones.

Last night's first neighborhood Ladies Bunco Night 
was no exception.

I chose a Southern theme for this night,
largely because of my 
raging {yes, I used the word raging} love affair with mason jars,
which I knew would be the binding constant
for all the decor I was planning on using.


Not to mention,
this theme would be a great excuse for me to try to make
these pecan tartlets I'd been meaning to make for some time now.

I also made mini caprese salads,

two kinds of mini quiches,
mini pulled pork sandwiches
and grilled cheese sandwich bites
with creamy tomato soup shots


{I'm a sucker for everything mini}

And of course, what party would be complete
without a signature beverage?
I chose to have mint juleps
{served in my favorite latch bottles},
sweet tea, and lemon water
and labeled with adorable doily tags that I made.


{Yes, I realize that mint juleps are not supposed to be mixed with water, but at the same time, I didn't need to be blamed by the neighborhood husbands for their wives not coming home because they would have passed out on my living room floor with how strong the mix itself was! It was mostly bourbon!}

We spent the evening laughing and having so much fun learning how to play Bunco
that yours truly forgot to take pictures of us playing the game!
{and for those of you wondering, I won the night's Most Bunco's prize -- a whopping $25! Hooray for lunch money this week!}

I also got an adorable hostess gift
from my beloved Canadian Michéle,
who is an artist.
Her favorite hobby is glass fusing,
and she owns this amazing kiln to "bake" all her finished products.
She "baked" me something and it was such a sweet and thoughtful gift!

Merçi beaucoup, mon amie!

I must say, everyone had a wonderful time
and we are looking forward to next month's event!

Redecoration Nation Part III

I told you so. 
I told you I'd been having a love affair
. . . with mason jars, that is ;-)

As promised in my preview post earlier this week,
here is a new addition to my decoration addiction.

So last week, I was perusing on Craigslist
{yes, I am a total gypsy. I LOVE Craigslist.}
And I saw this sweet corner unit.

I needed a corner shelf / hutch for my dining room
and I lucked out with this baby.


Cute, right?

Here are the touches I added to it:

Mason jars on a cake pedestal.
The mason jars are standard Kerr widemouth jars
and the cake pedestal was purchased from Crate and Barrel last year.


These vintage milk bottles are a recent find also from Crate and Barrel. 
I absolutely fell in love with them and it was such a bonus to me that they are Italian glass!


You asking about these babies?
Yes, they are some of my new favorite items in my house!
And the best part?
They are upcycled projects I made!
They were inspired by a find I had from Pinterest!
These vases are actually ones that my flowers have come in when J had given me some {i.e. Valentine's Day, anniversaries, and -- the best kind -- the "just because" ones!}.

J had bought me some paint in chartreuse green / Tiffany blue
{I sent him to Home Depot with one of my Tiffany boxes to get the correct blue}
and I used them to paint the inside of the vases.
{a DIY project to come in a future post!}
Now they stand proudly on top of my new corner hutch
next to my peonies in my white ceramic pitcher...
and I am
IN.
LOVE.

So next project to share:
My newly "vintage" tinted mason jars.
I haven't exactly figured out where they will be placed,
but I know I'm going to use them as lanterns
for my upcoming Bunco party that I'm hosting for the neighborhood ladies.
Our theme: Southern Belles and Mint Juleps!
Stay tuned for that post!

P.S.
Have you checked out our Etsy store lately?
Remember that all followers of the blog 
get an additional 20% off your entire purchase!


Redecoration Nation Part III PREVIEW

A preview of what is to come
for my next installation of Redecoration Nation
featuring...


... tah-dah!! 
Repurposed / upcycled vases!
Tune in for the next Redecoration Nation post!

Redecoration Nation Part II

Everything in this home is such a work in progress. I've finished the backdrop wall at the dining room and have migrated my redecorating fever to the family room.


Lately, I've been teaching myself how to sew.
Thank goodness that a few weeks ago, my mother-in-law came to visit
and she gave me a few pointers on how to use my sewing machine.


One of the first things I wanted to make was new pillowcases for my throw pillows in our family room.


Inspired by finds from my favorite Pinterest boards, 
and armed with some new muslin fabric
and adorable stencils from Mary LabarreArtistic Stencils, and Your Memories Captured all on Etsy
I began the daunting task of putting together designs and a color scheme to make my family room look more like it belongs in a home.


More than anything, I wanted to prove that I could actually sew something
with nothing more than a YouTube sewing education in my resume.


You tell me.


The room started out like this: free pillows with cheap hotel looking covers.


God-awful polyester quasi velvet ugliness:

As soon as we first bought the couch last year, I bought some lumbar pillows from Home Goods so as to soften the look of the room and to add a pop of color in what would have been a mere collage of poop brown.

Naturally, the first thing I did was to remove the Fruit Roll Up looking striped pillowcases and stashed them in depths of my laundry room that are only inhabited by lost socks.
And I replaced them with happier, self-stenciled, self-SEWN pillows.


{Yes, I know, the new pillowcases are wrinkled. That would be in large thanks to my brother and stepson, visiting for the weekend, and throwing their lanky, adolescent appendages haphazardly all over my furniture. Forgive me.}


Otherwise, I'm happy so far to have gotten rid of the velvety stripes. 

Next, the family room, and that lonely wall ascending by my stairs.

Have a lovely Sunday!


Redecoration Nation

We have lived in this house for three years.
For the first two and a half {more or less},
we didn't really talk to our neighbors
{largely because of a small bit of misinformation from neighbors who actually no longer live in our neighborhood}
and I actually seriously prefer to keep to myself. 
Don't get me wrong -- I'm nice, I'm cordial, and maybe even friendly,
but for the most part, I'm happy being at home crafting and blogging and being a homebody.
But such was not necessarily in the cards for me,
and recently, my husband has become acquainted with the neighbors, 
and naturally, I have been drug into this mix {though I wasn't exactly kicking and screaming as much as you may imagine.}


The point is, in the first few years of our stay here,
my home decor has catered more to the function rather than the aesthetics of living.
I have been, to say the least, slow at decorating or decisions to make anything pretty in the house.
My home style has been insipid.
Of course, after the loss of our girls and my now emphatic drive to keep busy, the decor inspiration has finally come.


First, I attacked what used to be a boring wall above our built-in entertainment center in our family room. 
My boss just so happened to be clearing out their storage unit and I asked if they could give me some extra picture frames. I then spray painted the frames in teal, yellow, and white and had some of our favorite wedding photos printed in black and white. Then I asked J to help me hang them.
This wall is actually curved, and at first, I was afraid that the frames would look funny, but they were just fine!
I also used this B monogram that I found at Home Goods last year and used as a prop for our wedding...


Then I took some hanging lanterns I found at Ikea and added some vintage cobalt bottles also found at Home Goods. The paper peony was a special order from Etsy and was part of our wedding centerpieces last year. I swear, I keep finding newer uses for these flowers all the time.
I thought that these would really compliment the wooden sign we got from J's cousin for the wedding.

Next thing I tackled was the backdrop wall in our dining room. For the longest time, it was just decorated with a poster that we had from when we first moved in together in our old condo.
I bought an unfinished wooden shelf from Michaels. J painted it black and then white so that it would look a little distressed.
I then hung up an aluminum farmhouse style star that I got from Home Goods.
and a burlap and lace bunting banner I made myself (soon to be on custom order sale at Benchmarks & Babies on Etsy)

I had some extra burlap from the banner, so I added it as an anchor for a mason jar flower vase that I made:
I also bought a small birdhouse from Michael's and painted it:
And my mom bought me some vintage keys from Tapers and Petals on Etsy {one of my newest favorite stores on Etsy!}.

These keys are just about my newest favorite item in my house!
I also put on some stoneware robins and a courting candle that I bought from a cute little boutique in McCall, Idaho called Something to Crow About.

The story of the courting candle is as follows: In the 1600's to the 1800's, courting candles were used by the man of the home to set boundaries for his daughter. When the daughter's suitor came calling, the father lit the candle in a sitting room where the couple conversed. When the candles burnt to the metal at the top of the candle holder, it was time for the suitor to promptly leave. However, the father could change the height of the candle based on how comfortable he felt about the suitor. Also, the father could immediately snuff out the candle or add a second candle depending on what he deemed necessary. The courting candle served as a quiet, yet firm reminder to the suitor to end his date. {source: Timeless Wrought Iron}

Here's the finished product:

These first two rooms have been fun, but I am still in the process of replacing our coffee table in the family room, getting a new dining set, and a new china hutch that match my decor scheme. I guess if you could imagine a California farmhouse on the beach, that's the look we're going for.

I can't wait to put together more of the house! I'll be sure to post more items as the days go by...


Top Mommy Blogs - Mom Blog Directory